Kitchen Islands: Do You Have Room for One?
Kitchen Remodeling: A Complete Guide
Almost everyone wants an island — it's usually the first thing that goes on the wish list. Whether your room can actually take one is arithmetic before it's anything else, and the arithmetic takes five minutes with a tape measure.
The math that decides it
An island needs a work aisle on every side facing a cabinet, an appliance, or a door. Run the numbers before falling in love with the idea:
- 24-inch base run + 42-inch aisle + 24-inch island + 42-inch aisle + 24-inch base run = 13 feet of room width
- With 36-inch aisles, which is tight but within guidance: 12 feet
- With 48-inch aisles for two cooks: 14 feet
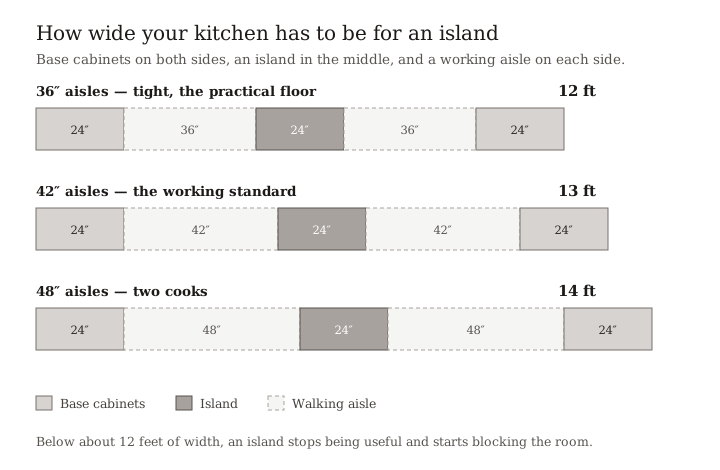
Below roughly 12 feet of width, an island stops being furniture and becomes an obstacle. In a small kitchen it can eat a substantial share of the usable floor while blocking the paths you walk every day.
Length matters too. Under about four feet, an island doesn't earn the floor it occupies. Family Handyman's sizing guidance suggests the island run roughly a third of the kitchen's length, with two by four feet as a small island, three by five as medium, and four by seven as large. This Old House puts the practical minimum at three by five feet with 42 inches of clearance to walls and cabinets, and its island build guide puts the same numbers next to drawings of the finished thing, which is easier to picture than a list of dimensions. Go past seven or eight feet and most stone slabs won't span it without a seam.
The test that settles it: tape the island footprint on your floor, set the stools where they'd go, then open the dishwasher, the oven, and the refrigerator. If any door touches the tape, the island is too big or the room is too small.
What you want it to do changes the price completely
The four jobs an island can do sit at wildly different price points, and the real jump happens the moment you add plumbing or a cooktop. Prep and storage cost almost nothing beyond the cabinets and countertop. Seating adds a bracket or two. A sink adds slab cutting and trenching, plus a plumbing vent that has to be solved without a wall to run it up. A cooktop adds slab or attic work of its own, plus a range hood and possibly a makeup-air system.
If the sink or cooktop doesn't have to live in the island, putting it on the perimeter run or a peninsula is the lower-cost and lower-risk choice. The island still delivers the prep surface and seating most people actually wanted.
Prep and storage only is the cheap version — cabinet boxes, a countertop, and maybe an outlet. No plumbing, no gas, no ductwork. This is the island most Phoenix homeowners should build, and it delivers most of what people actually want from one.
Seating adds almost nothing but structure. The overhang has to be supported, which usually means corbels or brackets, and the island box may need blocking.
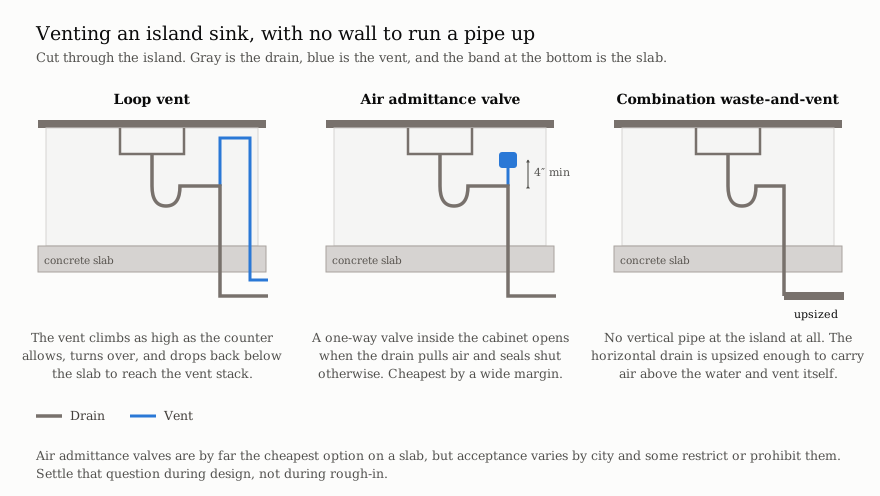
A sink changes the project. It needs supply, drain, and a vent — and the vent is the hard part, since an island has no wall behind it to run one up. Fine Homebuilding walks through the three code-compliant methods: a loop vent that rises under the counter and drops back below the floor, an air admittance valve mounted at least four inches above the horizontal drain, or an oversized combination waste-and-vent line. Air admittance valves are by far the cheapest option on a slab. But acceptance varies by city — some restrict or prohibit them — so have your contractor confirm what your city allows during design, not during rough-in. If you're wondering what this device even is, Oatey's Sure-Vent product page shows one: roughly a plastic cap that screws onto a pipe stub inside the cabinet.
On a Phoenix slab, an island sink means saw-cutting the concrete, trenching for new drain with proper fall, inspecting, backfilling, and re-pouring. If the island sits far from the existing drain stack, the trench gets deep quickly. And if the house was built from the late 1970s onward, the slab may be post-tensioned — steel cables under tension inside the concrete. Those have to be scanned and located before any saw runs. Cutting one is a serious, expensive failure. Look for the placard in the garage. This explainer shows how the cables sit inside the slab and what the stamp at the garage floor looks like, which is worth two minutes before you start planning an island sink.
A cooktop needs gas or a 240-volt circuit, landing space on both sides, and real ventilation. A ceiling-mounted hood works, but it has to duct through the attic to the roof, and it becomes the dominant object in the room. Downdraft avoids that but vents under the slab — which brings back the trenching problem — and it's less effective on steam and odors. Yale Appliance puts the two side by side with photos and test results, and seeing a hood hanging over an island next to a downdraft that disappears into the counter makes the trade-off obvious in a way that reading about it doesn't.
One code trigger decides a lot here. The residential code sets the line at 400 CFM: a hood that can move more than that must be paired with a makeup-air system. That's a code requirement, not a recommendation, and it's a separate mechanical system with its own cost. Green Building Advisor explains what a makeup-air system is and why the number is 400. Pull that much air out of a sealed house and something has to replace it — and a naturally drafted water heater will happily supply it backwards down its own flue. In Phoenix it also means pulling in outside air that can be 110 degrees unless it's tempered. Pick the hood before you price the island. Crossing 400 CFM changes the scope of the job.
Seating dimensions
If the island seats people, one more set of numbers matters. Overhang depth depends on the counter height, and it's the number most often gotten wrong:
| Counter height | Seating | Overhang needed |
|---|---|---|
| 28–30 in (table height) | Dining chair | 18 in |
| 36 in (standard counter) | Counter stool | 15 in |
| 42–48 in (bar height) | Bar stool | 12 in |
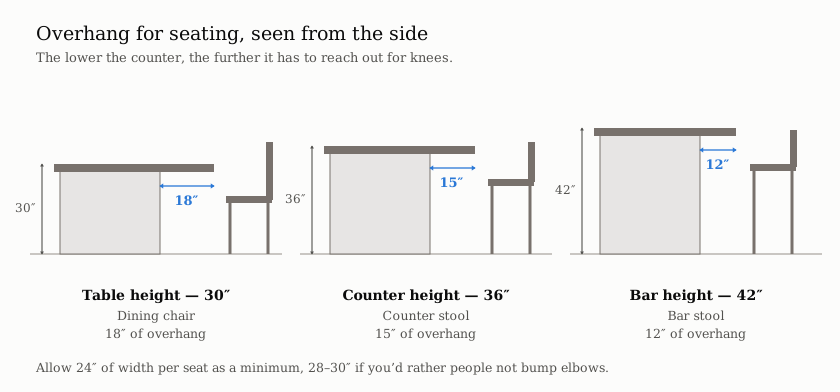
Stool heights follow the counter. Getting the pair wrong is the most common way a beautiful island ends up uncomfortable. Lowe's stool height guide lays the four seat-height ranges against the four counter heights, with photos of each.
Allow 24 inches of width per seat as a minimum, and 28 to 30 inches if you'd rather guests not bump elbows. A six-foot island edge seats three tightly or two comfortably. Behind the stools, leave 32 inches if nobody walks past, and 36 to 44 if they do.
Counter-height seating at 36 inches is the current default. It keeps the whole island usable as prep surface, works better for kids and older adults, and stools are easier to find. The 42-inch raised bar hides dishes from the living room and needs a shallower overhang, which often means no brackets. Dated-looking to some eyes — still genuinely useful when the island faces a seating area.
When a peninsula is the better answer
A peninsula attaches at one end, so it only needs clearance on three sides instead of four. That single difference makes it fit rooms an island can't. It's usually cheaper too, since plumbing and electrical can come from the adjoining wall run rather than under the slab.
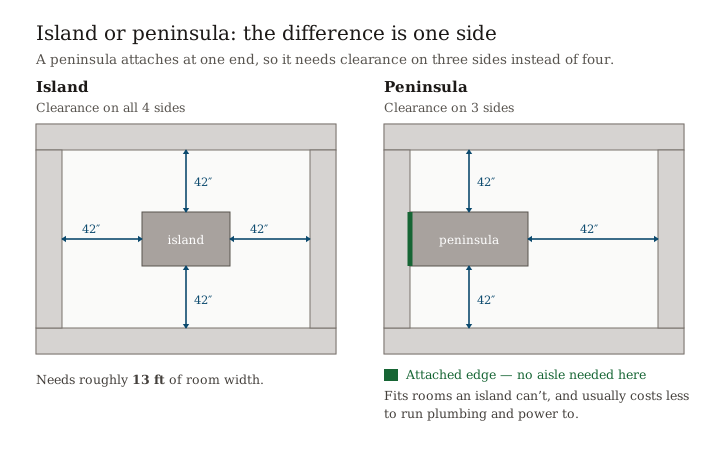
What you give up is circulation — a peninsula forces traffic around it, which matters in a house where everyone comes through the kitchen from the garage. It also creates another dead corner where it meets the run.
A rolling cart is the third option, and an underrated one. It costs almost nothing, needs no clearance when pushed aside, and gives you prep surface where you need it. Island popularity has actually been slipping in favor of L-shaped kitchens with movable pieces, so skipping the built-in island is a defensible design choice rather than a compromise.
The outlet rule that changed
Electrical code for islands was rewritten recently, and most guides still have it wrong.
Under the 2023 National Electrical Code, receptacles are no longer required at an island. But if you install one, it can't go on the vertical side of the cabinet anymore. It has to sit on or above the countertop within 20 inches, or be a pop-up assembly listed for countertop use. NAHB explains the reasoning: children pull on cords hanging from side-mounted outlets and bring appliances — including pots of hot liquid — down on themselves.
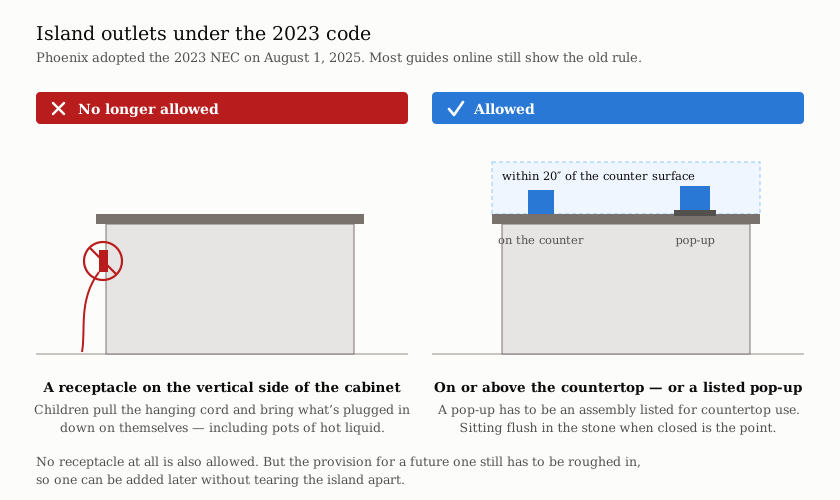
If you install no receptacle at all, you still have to rough in the provision for a future one, so it can be added later without demolishing the island.
Compliant options look different from what most people picture. Docking Drawer, which makes the hardware, photographs five ways to get power to an island — flush pop-ups that sit level with the stone until you press them, countertop units with a lid, and in-drawer charging. Worth a look before you decide you don't want an outlet in the island at all, since the objection is usually to how the old ones looked.
This matters locally because Phoenix adopted the 2023 NEC effective August 1, 2025 under ordinance G-7397, alongside the 2024 building, plumbing, and mechanical codes. A proposal to amend this particular section was submitted during the adoption process and denied, so the rule applies in Phoenix exactly as written. Surrounding cities adopt on their own schedules with their own amendments, so confirm with whichever one issues your permit.
Related: Choosing a Kitchen Layout · Where the Money Goes · Kitchen Countertops · Kitchen Decision Checklist
Common questions
- How much space do I need for a kitchen island?
About 13 feet of room width for comfortable 42-inch aisles. Twelve feet works with tighter 36-inch aisles.
- How much clearance does an island need?
42 inches on any side facing cabinets or appliances is the working standard. 36 inches is the minimum; 48 inches if two people cook at once.
- Can I put a sink in my island?
Yes, but on a Phoenix slab it means cutting and trenching concrete for the drain, plus solving the vent without a wall behind it. It's one of the more expensive things you can ask an island to do.
- How much overhang do I need for seating?
15 inches at a standard 36-inch counter, 12 inches at bar height, 18 inches at table height.
- How many people can sit at an island?
Allow 24 inches per seat minimum, 28 to 30 for comfort. A six-foot edge seats three tightly.
- Should I do an island or a peninsula?
A peninsula needs clearance on three sides instead of four and usually costs less to service with plumbing and power. If the room is under about 12 feet wide, it's often the right answer.